Wireless Connection Through WiFi With Bugjaeger
When I began developing Bugjaeger few year ago, the most common method to connect your target ADB device was through a USB cable. The option to connect through WiFi was available, but usually required an initial USB connection first.
Now wireless ADB connection is more common and google added some additional features in Android 11 that make establishing connection easier.
Bugjaeger provides two primary methods for wireless connection. Each way of connecting has different advantages and disadvantages.
In this blog post I'll try to explain how this works and how to establish connection in more detail.
Before You Connect
For a successful connection, you'll need to have a host and a target Android device.
Host device has Bugjaeger installed and is used to control the target.
Target device needs to have Developer Options enabled.
Those are usually 2 separate devices, but in some cases it can be useful for host and target to be the same device (see #11 in official FAQ).
Note: Both devices need to be connected to the same WiFi network.
Connecting Through Bugjaeger's Command ("Standard Way")
The "standard" way for a wireless connection that existed for a long time is to configure adbd daemon (running on target) to listen for connection on a specific port with the adb tcpip <port> command.
The disadvantage of this option is that you'll need to connect your target through USB cable first. Once it is configured, you should be able to reconnect to target through WiFi until target is rebooted (or until you disable developer options).
Some devices (like e.g. Android TVs) are already pre-configured to listen for WiFi connection, so you won't need the initial USB connection.
To connect with this method using Bugjaeger, first switch to the Commands tab. Then execute Connect through WiFi command. It'll allow connection on port 5555.
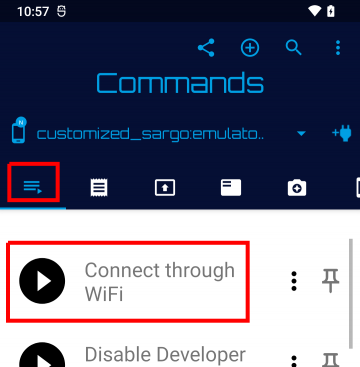
Internally Bugjaeger executes adb tcpip 5555.
Once the device is configured to accept ADB connection through WiFi, you can establish actual ADB connection with target.
Bugjaeger tries to connect to the target devices automatically, once you execute the previous command. This however doesn't always work reliably. Different target devices need different time to initialize connection and on some of my devices this even causes the USB connection to be interrupted for short period of time.
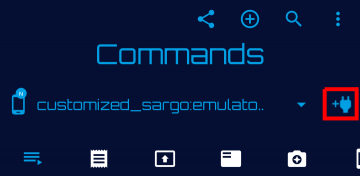
You can connect manually through the Connection dialog. Just open the connection dialog by tapping on the +PLUG button in top toolbar to the right of device list.
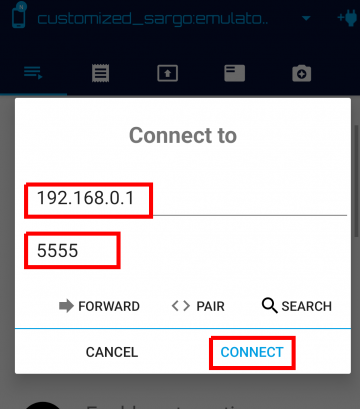
Enter the IP address and port and tap on CONNECT. Remember that Bugjaeger uses port 5555. You can find the IP address through the "Get WiFi IP address" command in Bugjaeger, or you can just open your WiFi settings on target and check the current IP address there.
When connecting a new host device to target for the first time, you'll need to confirm an ADB authorization popup dialog that will appear on target.
Remember that you need to tap on CONNECT.
Some users try to tap on PAIR instead, but this is something different. I'll explain this option in the next sections.
There's also the SEARCH option. This option tries to determine the range of IP addresses available on your local network and then tries to establish a connection on each of those (if possible). This way you don't need search for IP address yourself. This however doesn't work reliably on every network/device. It is also a "brute-force" method that can be slow. So I recommend to just connect directly, instead of waiting for search to succeed.
Wireless Debugging (Android 11+)
Target devices with Android 11 and higher can now be configured to connect with Bugjaeger (ADB) without the need for an initial USB connection.
Google added "Wireless debugging" to Developer options.
It works in a similar way as the method I described above.
However, you'll go through an initial pairing step. The pairing step is mostly for establishing thrust (authorization). You need to do it only once. After that you can connect as usual, without the need to do pairing.
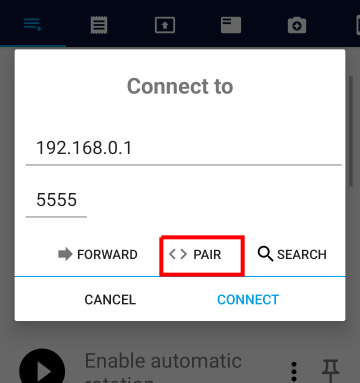
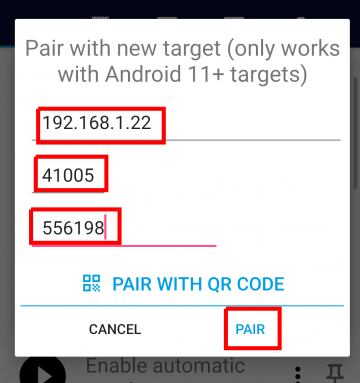
To pair host with target, open the Connection dialog in Bugjaeger again and tap on PAIR
There are two methods for pairing available. You can enter a pairing code with IP address and port manually. Or you can use a QR code generated by Bugjaeger to do the pairing automatically.
To get the details for manual pairing, go to Developer options -> Wireless debugging -> Pair device with pairing code`. You need to do this on your target.
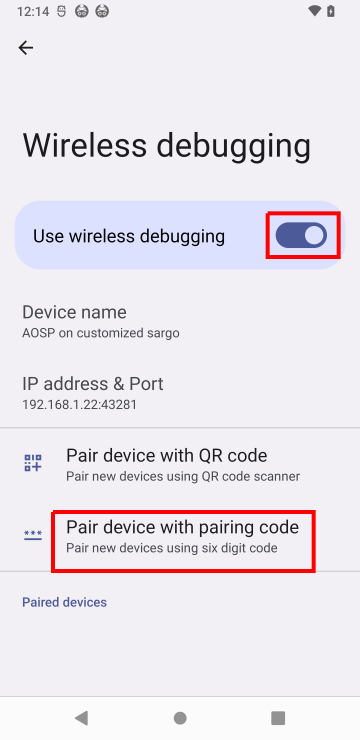
Note that there's a specific port that's only used for pairing (different from the port used for ADB connection)
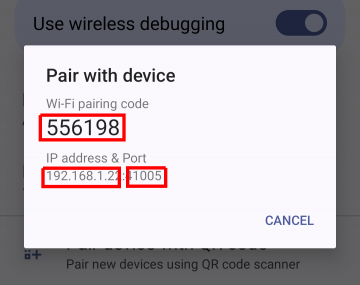
Now enter the pairing details into the pairing dialog in Bugjaeger.
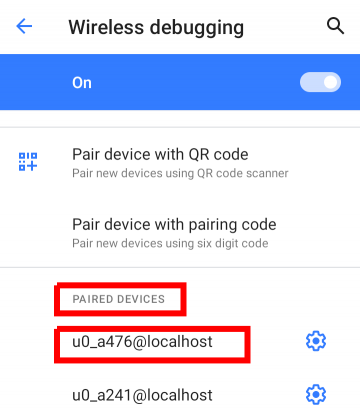
Your target device should appear in the list of paired devices in Wireless debugging settings.
The target device should also start to advertise the pairing details through Network Service Discovery (mDNS). So there's a chance that port and address will be filled out for you automatically.
To pair with a QR code instead, tap on PAIR WITH QR CODE in Bugjagers pairing dialog. Bugjaeger will generate a QR code that you can scan with your target device. To scan the qr code, you'll need to tap on "Pair device with QR code" in your target's Wireless debugging settings.
Once you're done with pairing, you can now connect to your target.
Note: You only need to do pairing step once at the beginning. It's used for establishing trust between host and target (authorizes host for ADB connection). If you then restart your device or Bugjaeger, you can just connect straight away without the need to the pairing step.
To establishing actual ADB connection with Bugjaeger and target, open the connect dialog again in Bugjaeger. Now enter the IP address and port shown on target in Wireless debugging
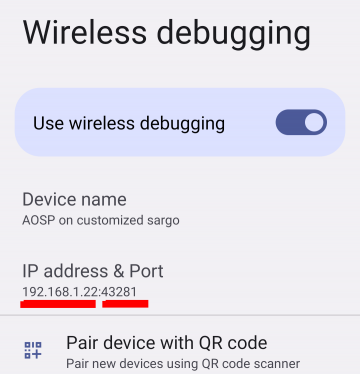
Note that this time the port is different (it's not the same port as we used for pairing and it's also not port 5555). The port also changes every time you re-enable Wireless debugging.
Luckily, right after you enable Wireless debugging, the IP address and port are usually advertised through NSD (mDNS) for a couple of seconds. So Bugjaeger might be able to fill connection parameters automatically for you.
On my devices the IP address and port for ADB connection are advertised only for only a brief period after enabling Wireless debugging. So you need to have the connection dialog open around the same time to ensure that IP and port can be filled automatically.